Wednesday, September 21, 2011

The Wendigo Way - Crocodile Games Wendigos

I really needed a small break from Arachnarok; I've had hand cramps for two days from doing detail work.  I hate it when you get down to the last few details and you just have to give up for a while.  So, in the mean time, I started an order of Wendigo from Crocodile Games, actually two sets.

Normally the Wendigo are painted like Yeti, all white and icy blue.  I've done that before and this client so happened to buy those Wendigo a couple years back.  Now, he wants his Wendigo painted like Sasquatch for the savannah and woodlands.  Sounds cool, right?  Yep, I think so.  At least this provides a challenge.  I love painting something I've painted before and painting it very differently.  Yesterday I did the two captain figures, because they are the largest, in order to see if the color schemes I have in mind are going to work out.  There's nothing like base-coating twenty or so figures only to have your plan fall flat once you start to apply the other colors.

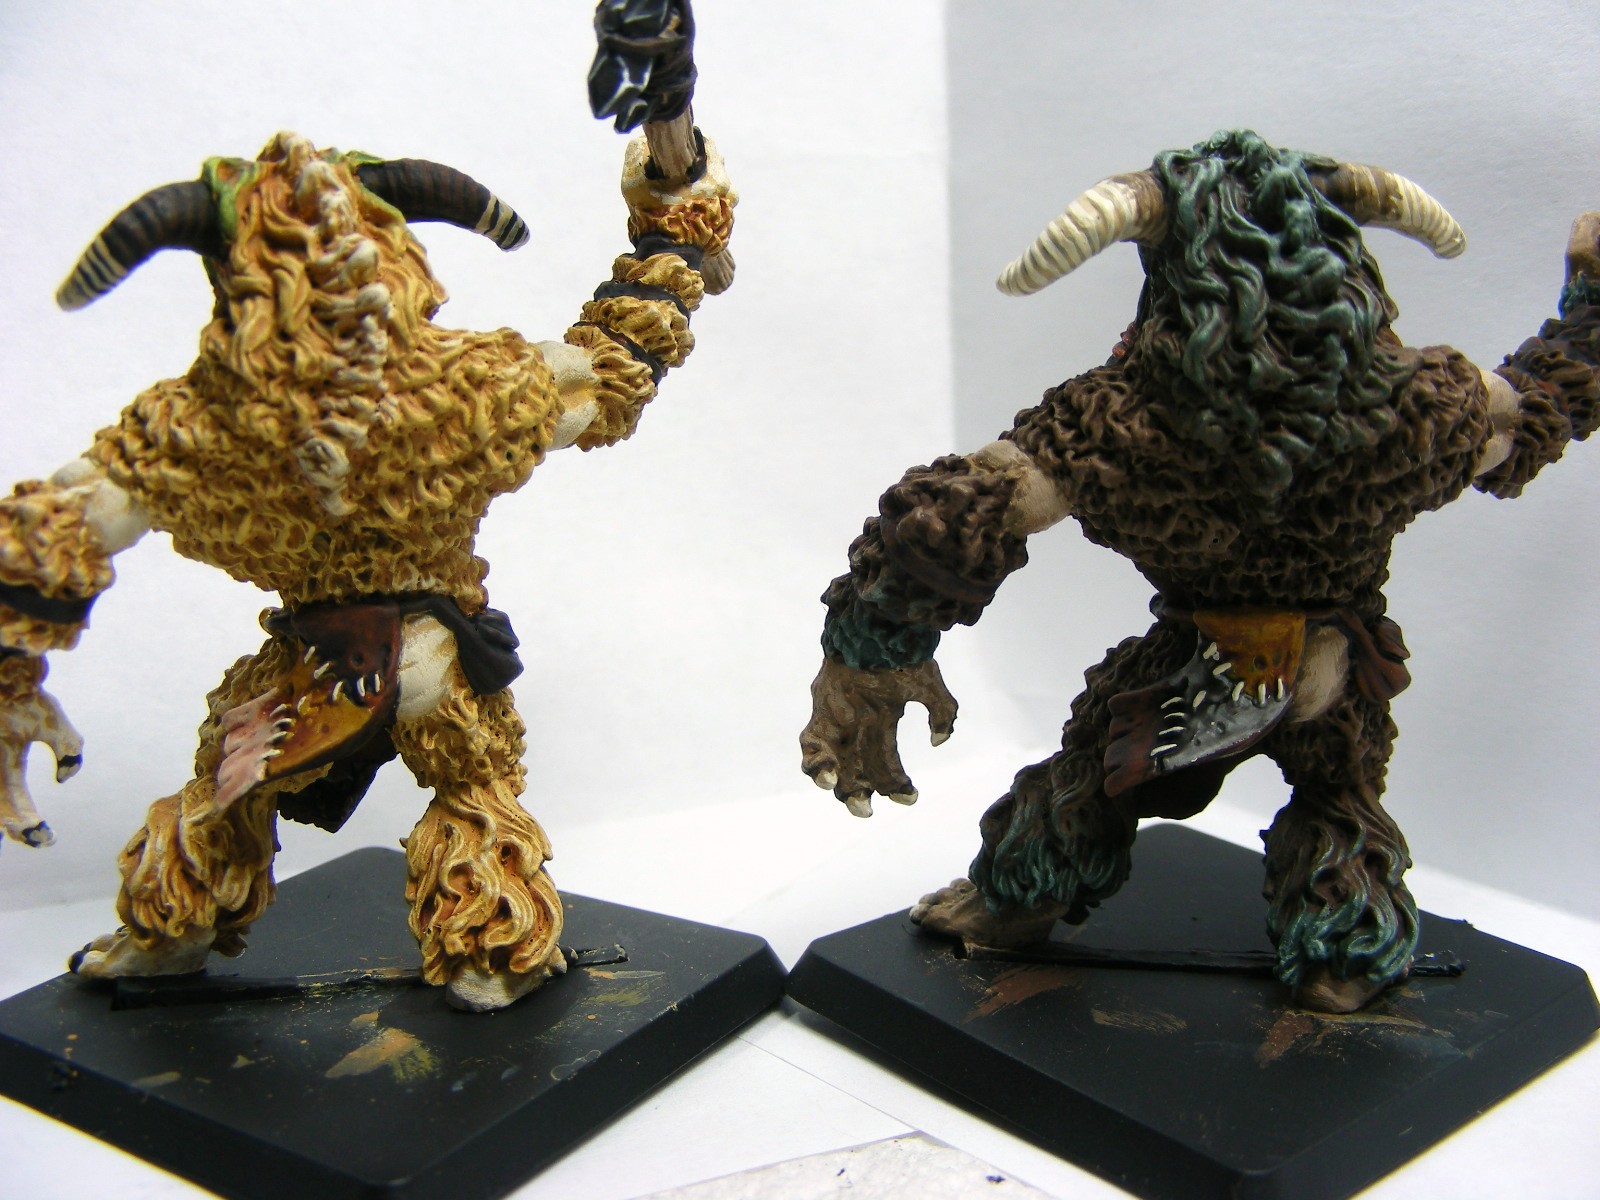
Here we go...I started out by base-coating one in Burnt Umber (left: Woodlands) and the other in Light Brown 10 (right: Savannah)  .
 

Next, I heavily brushed Wood Gray onto the Woodlands figure.
and heavily brushed Ocher onto the Savannah figure.  Yes, this is very subtle, I think I could actually omit this color altogether.

Then, I lightly brushed Grayed Orange Yellow onto the Woodlands figure and used Highlands Moss to accent his pony tails, the top of his head (partially down his back), around his hands, and his feet.  The fleshy part (the chest, hands, feet, face) are painted solidly with Wood Gray, highlighted with Grayed Orange Yellow, then the GOY is diluted with a bit of water (imagine a watercolor) and applied to the fleshy areas.  Finally, after the GOY watercolor is dried, dry brush on a highlight of Grayed Orange Yellow 11.
I wanted this Sasquatch to have a mossy tree appearance and yet still seem realistic.

and lightly brushed the Ochre 11 on the Savannah figure and added Creamy Ivory highlights/accents to the top of the head (partially down the back), the pony tails, and the beard.  Yes, for some reason I forgot to take a picture of this step.  I was really enjoying myself, and when I do that I tend to move quickly.  Taking the photos does kinda burden my momentum. 
No pictures of the Sasquatch, but here are the colors used.
 POOF!  And now, here we are done!  Yeah, whatever.  Don't we all wish it was that easy.  Like I said, momentum.  Sorry there are no photos of all the little steps.  I know, I suck; but here's where I'll talk about some choices I made when considering how to paint this figure two different ways.

The Woodland:  Like I said, I wanted him to appear as a mossy tree and yet still seem realistic.  However, I didn't want him to look like a bear or an ape.  I thought about what colors look best or seem to fit with the woodlands and I decided on copper for his ponytail closures.


The feather.  Why blue?  I think it was because I wanted one little thing to POP.  I guess that and I've got a lot of bluejays around the house here.

For the horns, I thought about deer, the way they fade from a dark brown to a creamy ivory.  The toenails too are like the horns, ivory with a touch of dark brown where it enters the toe or finger.
I like the way the copper works with the green and adds to the browns as well.
For nails and horns, paint on the Stained Ivory, detail on the Creamy Ivory and then wash near the base of the head or where the nail meets flesh with the Devlan Mud.

As for the weapon, I could have gone a couple different routes but I thought that plain grey stone was best, something neutral, nothing outlandish.  I was originally thinking about mossy agate or maybe even black onyx.

These colors were used for the stone hammer.  A coat of Stone Grey with a drybrush of Weathered Stone.

Minus the Burnt Umber, these three colors make up the primary shades for the Woodland Sasquatch.
This triad, actually the first and last, were used as a accent green.  Jungle Moss is the base and Pale Lichen is the highlight.

The Savannah:  This creature needed to appear as if it came from the plains of Africa.  Somewhere where the grass is a golden hue touched with lively greens.  For inspiration I looked to lions and herd animals but I wanted to make sure that it was not as brown as the Woodland.The accent green, I wanted fresher and more lively.  But where to put it?  I didn't want too much, so I only applied near the face and horns.

The red feathers?  Again, I think it was just for a POP factor.  That one thing that stands out.
Notice the horns, there is a type of gazelle that has horns that begin almost black and turn to an ivory, I thought a nice deep color would contrast nicely with the golden furn.  I chose the same concept for the nails.

These two colors were used for the green highlights above.  Olive Green was delicately painted on, then the Olive Drab was drybrushed lightly over top, just to catch the high points of the hair.

As for the weapon, I went with an onyx or obsidian.  Something about Africa or any plains makes me think about dark rocks.  Don't know why, I'm not saying it is geologically accurate.  
This is simply Black, with dark Gray (Gray 28), Gray 5 and white highlights painted onto the high points.
Finally, these are the colors used for the mouth and lips.  Paint on the Antique Rose and then use the Porcelain Rose as the detail to create tongue groove and lip creases.

If I had pictures of the original Wendigo that I painted years ago, the ones with the Yeti icy fur, I'd have gladly posted them as well in order to demonstrate how different things can look.  I always suggest playing with colors and using your imagination.  If you play with toy soldiers/miniatures, I hope you are already using your imagination.
Love - Allison Chicka

15mm Napoleonic Russian Army Based for Lasalle Ruleset

15mm Napoleonics are pretty popular for us. They race neck and neck with 15mm World War II for the most popular periods we paint. I can understand why with Napoleonics: the uniforms are complex and require quite a bit of research, there are usually a ton to paint up to get an army together, and it can be rather monotonous painting over 300 of the same thing over and over again! I know I was feeling that way with this order. It took me a bit longer to get the order done but to be honest I was also trying to get some of the cleaning and priming done for the Fall-In orders. More on that at the end.

There are 317 foot, 114 mounted, 21 guns and 6 limbers in this army. All figures are AB figures and the flags are from The Flag Dude. The bases are from Litko.The army is supposed to represent the Russian Life Guard Division during the Battle of Borodino.

The infantry composed of the Preobrajenski, Siemenovski, and Izmailovski regiments.


The cuirassier units composed of the Emperor, Empress, Chevalier-Garde, and Life Guards units.


The army and sub commanders.

The artillery stands. Two units of Position Batteries and one Horse Battery.


A note on the limbers: Technically there should be more space between the ranks of horses on the Russian limber teams due to the way design of the yoke. This would result in exceptionally long bases and possibly have consequences in game play. In order to make everything fit on the base size I had to condense things a bit and widen the space between the two columns of horses. This makes the limbers about the same size as the French ones he already has and keeps anything from hanging out over the edge of the base, preventing damage during game play.


The bayonets of the AB Russians are a bit fragile. In fact, almost all of them were bent over in the packaging, some more than 90 degrees. I straightened them as best I could but I didn't want to keep moving them around further weakening them, as some had already broken off. . Since they need to be packed up and shipped out to the customer I am sure some will need a slight readjustment afterward. That is a downfall of more realistically proportioned miniatures: weak parts. Personally I prefer something more robust, especially for gaming, since it will be handled more often.

Now that this order is out of the way I can jump into the Fall-In orders. There's still an order of Reapers that needs based up (about 50 figures), and some basing to do for display orders for Acheson Creations and Scale Creep Miniatures, but the painting for the other orders is out of the way. We did manage to get a couple of things done already but the lion's share of it still needs done. I laid everything out on the dining room table Saturday to get it organized and take stock of where we were and here it is:

Orders for Fall-In


These figures are already painted and simply need to be based.

The lead I already need to clean and prime yet. It will add about 3-4 more trays of figures to be painted.


Hopefully I can get it done. It will be tough as there's only about a month until the show and Allison is due to sub for a teacher going out on maternity leave. It'll be a rough October!

Sunday, September 18, 2011

Along Came a Spider Part 2 - GW Arachnarok Spider

So the other day I posted what was the beginning of this adventure to slay the beast that is Arachnarok.  Okay, so maybe it's not an adventure and maybe I'm not actually slaying anything, but lately it feels like it.  Onward and upward, or at least forward, perhaps downward, maybe sideways - at least not backwards.

I'm making progress but it is slow going due to all the legs getting in the way, and I finally did break off one of the scaffolding parts like I thought I would.  I warned you, be careful.  Even I, who was ever cautious, managed to bust off a piece.  Bob didn't find it amusing.

Now here's some more of my progress...however, I'm not finished yet.

At last post, the carapace was done.  I was working on highlighting the abdomen, painting the rigging, and beginning the legs.

The Abdomen
Paints Used:
When I mix paints I usually make up a card, like this one, to remind me how the colors I made are supposed to appear.  So now you see the transition between the original Hormagaunt Purple with the mixture of Creamy Ivory.

Process/Techniques:
Last post I had only base-coated and applied the first highlight.  This time I went back and added the final highlight by using a mixture of the Hormagaunt Purple and Creamy Ivory.  I can't give you a percentage per say but I can say that it is mostly Creamy Ivory with a touch of Hormagaunt Purple.  If you go to mix it you will find that the purple is very strong and it takes very little to make the ivory purplish.  I'd say a 2:1 ratio of Ivory to Purple, almost a 3:1.
Basic application is a pseudo-Dallimore method over the other, middle, highlight.  Only this time you can create additional creases and separate some of the bulbous folds into smaller bulbs.  For example, check out near the back two stingers in the picture below.  All those little lines provide depth and create the creases or folds. 

Spider Babies and Egg Sacks
Paints Used:
Spider Babies
Egg Sacks


Process/Techniques:
The Spider Babies will eventually look just like their mama.  So far I've painted them solid Model Color Red and washed them with Badab Black.  Eventually they will be detailed with Red and Orange Yellow; however, not so detailed as their mother.
As for the Egg Sacks, I wanted them to stand out a little from the creamy purple abdomen.  At first I thought I wanted a sickly green, almost nasal infection green.  Yeah, you know which green I mean.  However, after careful consideration I felt that that would look a bit off so I chose a more muted sickly green with the Undead Triad from Reaper Master Series.  The egg sacks are simply painted with the base color of Ghoul Skin, highlighted with Moldy Skin, and a final dot of Bloodless Skin.  They will probably be glossed in the final product to give them a wet appearance, as if they are about to burst.


Webs
Paints Used:

Process/Techniques:
So far, only the base color has been applied to the webs and they will be washed with Devlan Mud in order to bring out all the tiny strands.  After that I will either dry-brush or carefully paint each strand with Polished Bone.  I'm sure I'll be holding my breath a lot for that one.


Scaffold
Paints Used:

Process/Techniques:
I simply painted the scaffolding with the Wood Gray and then dry-brushed on a highlight of Grayed Orange Yellow.  The "cut" ends of the scaffold that appear to be spear-like are painted Grayed Orange Yellow and will eventually be detailed in Stained Ivory and Creamy Ivory.  I'll show more of that when I finally do it, which won't be until the end. The log at the back of the spider is colored exactly the same way as the scaffold.

Next up: Along Came a Spider Part 3 - finish the scaffold, the log, the legs, and begin the horns/spines.
BTW - I'm waiting on doing those spines/horns because they are good gripping points for my fingers.