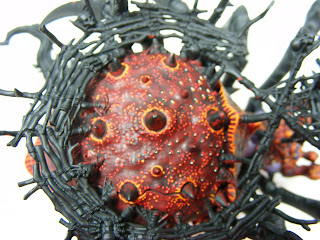
 Bob assembled the spider and found that it took him over two hours because the schematics are rather poorly put together. He suggests reading the full schematics first, then dry-fit assemble prior to actually trying to glue.
Another suggestion is this, perhaps painting it on the sprue is a better idea than fully assembling prior to painting. That way all you would have to do is touch-up where you cut off the sprue and where the glue left a residue. Right now I'm having difficulty in doing the detail work between the many legs and the scaffolding rig. The pieces that jut out from the main body not only get into the way of the paintbrush but also mess with my depth perception and I have found my brush going astray on many occasions.
*Note: These directions seem out of order, they are grouped by the body part of the spider but follow the STEPS if you really choose to paint in the order that I did. This order was done for ease of painting.
Main Body Colors for Carapace:
First let's start with the paints that I used...Base-coat: of Model Color Red. Let dry thoroughly, may take two coats. Do not dilute with water unless your paint appears to be too thick.
Washes: Citadel Badab Black and Leviathan Purple. Used over the base-coat to go into the crevices and darken chosen areas.
Highlights: Cel-Vinyl Red and then Orange Yellow.
Techniques/Process...
Step1 - After the initial base-coat I darkened the very top of the body, the face, and the portions of the collar above the head with the Badab black. Before the black dried too much, I used the Leviathan Purple around the edges of the black and bled it into what was left of the red at the edges of the carapace. You'll see that it nicely darkens the crevices as well as all the little bumps, horns, and spines on the carapace. Let this dry thoroughly.
Step 3 - The tricky part. See Step 3 image(s). This takes a very steady hand and don't let the legs get in the way or you'll find you're making squiggly lines. I suggest taking deep breaths and holding it as you make lines. I'm considering becoming a pearl diver in the orient when I'm done painting. I typically brace my painting hand at the wrist with my opposite hand as I do the edging lines.
Use the Cel-Vinyl Red to make the first highlight. Go over all edges, all bumps, and around the horns/spines. Again, take note on the box art. You'll notice that there are also triangular accent marks that come down off the edges of the carapace, see note under picture. I used a 10/0 brush to do all these details. You may need to thin your CV Red just a little to keep it flowing, the red tends to be/get sticky and you won't have smooth lines.
 |
| STEP 3. Highlight all the bumps and around the horns/spines in Red and then with Orange Yellow. |
Abdominal Colors:
Here are the only two colors...
Base-coat: Citadel Hormagaunt Purple
Highlight: Citadel Hormagaunt Purple + Reaper Creamy Ivory = a pale, creamy purple.
2nd Highlight: Reaper Creamy Ivory
Techniques/Process...
Step 2 - Paint the abdomen underneath. I suggest looking at the box art to see where the abdomen ends and the carapace begins (If you care). Use the Hormagaunt Purple from Citadel straight out of the jar and base-coat. The foundation paints are rather thick, so if you find yours not speading well, dilute lightly with water or add a retarder like Liquitex Slow-Dri.
Step 4 - Highlight the abdomen. Mix the Hormagaunt Purple with the Creamy Ivory until you get a pale, creamy purple color. Apply this pseudo-Dallimore style over all the high bumpy parts and high ridges of the fleshy part of the spider's abdomen. See image Step 4 below.
Step 5 - I have yet to do step 5 on this model; however, it will involve a final highlight with the Creamy Ivory over the raised bumps and high ridges of flesh.
 |
| STEP 4 |
 |
| STEP 4 |
Eyes:
Colors used...Base-coat: Black (any kind)
Highlight: Citadel Necron Abyss
2nd Highlight: GW Ultramarines Blue
3rd Highlight: Model Color Deep Sky Blue
4th Highlight: White (any kind)
*Note: after a spray varnish coat when the model is complete, a gloss varnish will be applied to the eyes.
Techniques/Process...
The eyes can be done at any point in the process, however I was feeling bogged down by the highlighting of the carapace and wanted to see progress so I painted the eyes. See Eye Image.
- First, paint the eyes black.
- On lower half of eye apply Necron Abyss. It will be rounded on the top; follow the contour of the eye.
- Next, apply a comma-like swish to the bottom of the eye using Ultramarines Blue.
- Then, apply a tinier comma-like swish using the Deep Sky Blue on top of the Ultramarines Blue.
- Finally, apply a dot and curved dash of White at the top of the eye in the Black portion.
 |
| Eye: Notice the shapes that create the eye. |
"Along Came a Spider Part 2" will be coming shortly. If I don't explode my lungs first.
Be 100% careful about accidentally bending the back legs attached to the fallen log and with the scaffolding on the body. Again, this is why I'm thinking it would have been advantageous to paint then assemble or perhaps do some assembly, paint, and fully assemble. Hey, live and learn.
Love - Allison Chicka


No comments:
Post a Comment