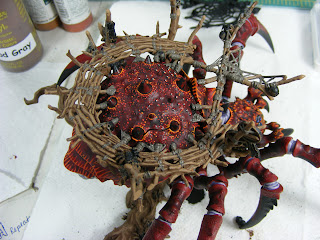
I'm making progress but it is slow going due to all the legs getting in the way, and I finally did break off one of the scaffolding parts like I thought I would. I warned you, be careful. Even I, who was ever cautious, managed to bust off a piece. Bob didn't find it amusing.
Now here's some more of my progress...however, I'm not finished yet.
At last post, the carapace was done. I was working on highlighting the abdomen, painting the rigging, and beginning the legs.
The Abdomen
Paints Used:Process/Techniques:
Last post I had only base-coated and applied the first highlight. This time I went back and added the final highlight by using a mixture of the Hormagaunt Purple and Creamy Ivory. I can't give you a percentage per say but I can say that it is mostly Creamy Ivory with a touch of Hormagaunt Purple. If you go to mix it you will find that the purple is very strong and it takes very little to make the ivory purplish. I'd say a 2:1 ratio of Ivory to Purple, almost a 3:1.
Basic application is a pseudo-Dallimore method over the other, middle, highlight. Only this time you can create additional creases and separate some of the bulbous folds into smaller bulbs. For example, check out near the back two stingers in the picture below. All those little lines provide depth and create the creases or folds.
Spider Babies and Egg Sacks
Paints Used:
 |
| Spider Babies |
 |
| Egg Sacks |
Process/Techniques:
The Spider Babies will eventually look just like their mama. So far I've painted them solid Model Color Red and washed them with Badab Black. Eventually they will be detailed with Red and Orange Yellow; however, not so detailed as their mother.
As for the Egg Sacks, I wanted them to stand out a little from the creamy purple abdomen. At first I thought I wanted a sickly green, almost nasal infection green. Yeah, you know which green I mean. However, after careful consideration I felt that that would look a bit off so I chose a more muted sickly green with the Undead Triad from Reaper Master Series. The egg sacks are simply painted with the base color of Ghoul Skin, highlighted with Moldy Skin, and a final dot of Bloodless Skin. They will probably be glossed in the final product to give them a wet appearance, as if they are about to burst.
Webs
Paints Used:Process/Techniques:
So far, only the base color has been applied to the webs and they will be washed with Devlan Mud in order to bring out all the tiny strands. After that I will either dry-brush or carefully paint each strand with Polished Bone. I'm sure I'll be holding my breath a lot for that one.
Scaffold
Paints Used:Process/Techniques:
I simply painted the scaffolding with the Wood Gray and then dry-brushed on a highlight of Grayed Orange Yellow. The "cut" ends of the scaffold that appear to be spear-like are painted Grayed Orange Yellow and will eventually be detailed in Stained Ivory and Creamy Ivory. I'll show more of that when I finally do it, which won't be until the end. The log at the back of the spider is colored exactly the same way as the scaffold.
Next up: Along Came a Spider Part 3 - finish the scaffold, the log, the legs, and begin the horns/spines.
BTW - I'm waiting on doing those spines/horns because they are good gripping points for my fingers.


No comments:
Post a Comment