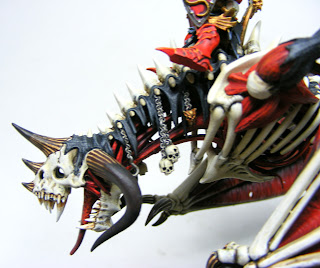
Assembly and Painting of the Vampire Count Undead Dragon: or How I Nearly had an Aneurysm
The same patron that ordered the Coven Throne and Mortis Engine also commissioned to have the Undead Dragon done. Although I was more interested in doing the bat version with the ghoul riding it I dove right in and found it to be a daunting task.
As I said in the previous posts about the Throne and Engine I don't usually do the assembly. I think that it is misleading for a person who "usually" or "always" puts together figures, especially complex ones, to comment on difficulty or time required. Well, for all of you who read this, I AM A NOVICE. Additionally, glue and I don't always get along, especially super glue. Once, I superglued my hand to the emergency brake of my Hyundai while trying to fix my shoe. So, okay, laugh, chalk it up to female incompetence like, "Why were you fixing your shoe with superglue in your car?" Yeah, yeah, I know - not so smart.
This model is a trial in patience for the following reasons...
Problem 1: you think you can assemble it before painting (oh how wrong).
Problem 2: the directions are all but useless (and don't tell me I have to buy the damn White Dwarf).
Problem 3: it is damn near impossible to get the wings, legs, feet, extra claw and rock positioned and glued (aneurysm).
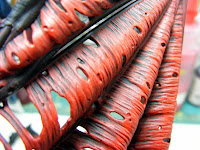
Soooo...I stared out by painting the primary (largest) parts of the dragon Vallejo Red and then washing it with Leviathan Purple. However, with the wings I only placed the wash right along the ribs of the wings, not on the main leathery part. You can see what I mean in the picture below.
This close-up of the wing also shows that I didn't paint directly into the ribs of the wings with the Vallejo Red, I just kinda over brushed and allowed the black underneath to show through. The centers of the wings are solidly painted with the red.
I also painted the fleshy parts of the legs the same red and washed them also. Notice, all these parts are separate, were sprayed black separately and will be painted separately until they can then be assembled. Reasoning? Well, there are a bunch of inner details on the main body of the dragon and around the neck that would be virtually impossible to reach if the model were to be assembled either fully or partially. I kept all the pieced separate until I was sure I got what I needed.
Here you that I have highlighted the body and wings with Cel-Vinyl Red, Vermilion and a touch of Yellow Orange.
In the two images above we see the Leviathan Purple wash, it helps bleed the darkness near the ribs toward the center fleshy portion of the wings without blackening.The next step is to embark on the bone colors. Again, all was painted separately. Those ribs that are glued onto the main body below were done separately then glued on, as was the entire head.
For the bone I used Cel-Vinyl Tan 16 (Bleached Bone), washed it with Devlan Mud, over-brushed with Tan 16, then dry-brushed Tan 6, and finally White.
For the horns and claws they were painted Cel-Vinyl Burnt Umber. Using Tan 16, delicate lines were painted starting at the base of the horn at its thickest and tapering off thinly toward the tip of the horn. You may need to slightly dilute your Tan 16 with flow improver or water so that it won't clump. Also, I didn't make my lines run to the very tip of the horn or claw, they end part way up. After the lines dry I washed the whole horn/claw with Sepia, then Devlan Mud in the middle, and very tip with Badab Black. Do all of this while each is still wet, that way they will blend into one another.
Thank golly that the model is beautiful once put together. With some modification I was able to level out the foot to make the dragon sit flat. I also glued his tail to the base for added support. Final touches to the base also proved to be difficult as I didn't want to flip the model over to knock off loose talus or flock. Base your model with care, I used a small spoon to place gravel and flock and a large fluffy brush to knock excess flock off of places.
Crisis Averted and Piece Finished...

The Vampire Count's armor is Cel-Vinyl Red with Leviathan Purple in the creases only with an over brush of Red again, and Vermilion. Yellow Orange was used to spot highlight where the armor is sharp. His gilded armor is Shining Gold, Ogryn Flesh wash, with a highlight of Burnished Gold. The black is the same as black flesh of the dragon, only spot highlighted (pseudo-Dallimored) instead of dry-brushed.
 |
| Can you see the fade of the three washes? Sure, first Sepia, then Devlan Mud, then Black at the tip. Remember, make sure they are all wet when you apply so they can flow and blend into one another. |
With Love, Allison


Yet another masterpiece my friend!
ReplyDeleteAmazing work!!
ReplyDelete